Ref:
Guidance for configuring IPv6 in Windows for advanced users
Windows Vista, Windows Server 2008, and later versions of Windows implement RFC 3484 and use a prefix table to determine which address to use when multiple addresses are available for a Domain Name System (DNS) name.
By default, Windows favors IPv6 global unicast addresses over IPv4 addresses.
Applies to: Windows 10 - all editions, Windows Server 2019, Windows Server 2016, Windows Server 2012 R2
Original KB number: 929852
Summary
It is common for IT administrators to disable IPv6 to troubleshoot networking-related issues such as name resolution issues.
Important
Internet Protocol version 6 (IPv6) is a mandatory part of Windows Vista and Windows Server 2008 and newer versions. We do not recommend that you disable IPv6 or its components. If you do, some Windows components may not function.
We recommend using Prefer IPv4 over IPv6 in prefix policies instead of disabling IPV6.
Use registry key to configure IPv6
Important
Follow the steps in this section carefully. Serious problems might occur if you modify the registry incorrectly. Before you modify it, back up the registry for restoration in case problems occur.
The IPv6 functionality can be configured by modifying the following registry key:
Location: HKEY_LOCAL_MACHINE\SYSTEM\CurrentControlSet\Services\Tcpip6\Parameters\
Name: DisabledComponents
Type: REG_DWORD
Min Value: 0x00 (default value)
Max Value: 0xFF (IPv6 disabled)
| IPv6 Functionality | Registry value and comments |
|---|---|
| Prefer IPv4 over IPv6 | Decimal 32 Hexadecimal 0x20 Binary xx1x xxxx Recommended instead of disabling IPv6. |
| Disable IPv6 | Decimal 255 Hexadecimal 0xFF Binary 1111 1111 See startup delay occurs after you disable IPv6 in Windows if you encounter startup delay after disabling IPv6 in Windows 7 SP1 or Windows Server 2008 R2 SP1. Additionally, system startup will be delayed for five seconds if IPv6 is disabled by incorrectly, setting the DisabledComponents registry setting to a value of 0xffffffff. The correct value should be 0xff. For more information, see Internet Protocol Version 6 (IPv6) Overview. The DisabledComponents registry value doesn't affect the state of the check box. Even if the DisabledComponents registry key is set to disable IPv6, the check box in the Networking tab for each interface can be checked. This is an expected behavior. You cannot completely disable IPv6 as IPv6 is used internally on the system for many TCPIP tasks. For example, you will still be able to run ping ::1 after configuring this setting. |
| Disable IPv6 on all nontunnel interfaces | Decimal 16 Hexadecimal 0x10 Binary xxx1 xxxx |
| Disable IPv6 on all tunnel interfaces | Decimal 1 Hexadecimal 0x01 Binary xxxx xxx1 |
| Disable IPv6 on all nontunnel interfaces (except the loopback) and on IPv6 tunnel interface | Decimal 17 Hexadecimal 0x11 Binary xxx1 xxx1 |
| Prefer IPv6 over IPv4 | Binary xx0x xxxx |
| Re-enable IPv6 on all nontunnel interfaces | Binary xxx0 xxxx |
| Re-enable IPv6 on all tunnel interfaces | Binary xxx xxx0 |
| Re-enable IPv6 on nontunnel interfaces and on IPv6 tunnel interfaces | Binary xxx0 xxx0 |
Note
- Administrators must create an .admx file to expose the registry settings of below table in a Group Policy setting.
- You must restart your computer for these changes to take effect.
- Values other than 0 or 32 causes the Routing and Remote Access service to fail after this change takes effect.
By default, the 6to4 tunneling protocol is enabled in Windows when an interface is assigned a public IPv4 address (Public IPv4 address means any IPv4 address that isn't in the ranges 10.0.0.0/8, 172.16.0.0/12, or 192.168.0.0/16). 6to4 automatically assigns an IPv6 address to the 6to4 tunneling interface for each address, and 6to4 dynamically registers these IPv6 addresses on the assigned DNS server. If this behavior isn't desired, we recommend disabling the IPv6 tunnel interfaces on the affected hosts.
You can also follow these steps to modify the registry key:
Open an administrative Command Prompt window.
Run the following command:
Consolereg add "HKEY_LOCAL_MACHINE\SYSTEM\CurrentControlSet\Services\Tcpip6\Parameters" /v DisabledComponents /t REG_DWORD /d <value> /fNote
Replace the <value> with the corresponding value.
How to calculate the registry value
Windows use bitmasks to check the DisabledComponents values and determine whether a component should be disabled.
To learn which component each bit (from low to high) controls, refer to the following table.
| Name | Setting |
|---|---|
| Tunnel | Disable tunnel interfaces |
| Tunnel6to4 | Disable 6to4 interfaces |
| TunnelIsatap | Disable Isatap interfaces |
| Tunnel Teredo | Disable Teredo interfaces |
| Native | Disable native interfaces (also PPP) |
| PreferIpv4 | Prefer IPv4 in default prefix policy |
| TunnelCp | Disable CP interfaces |
| TunnelIpTls | Disable IP-TLS interfaces |
For each bit, 0 means false and 1 means true. Refer to the following table for an example.
| Setting | Prefer IPv4 over IPv6 in prefix policies | Disable IPv6 on all nontunnel interfaces | Disable IPv6 on all tunnel interfaces | Disable IPv6 on nontunnel interfaces (except the loopback) and on IPv6 tunnel interface |
|---|---|---|---|---|
| Disable tunnel interfaces | 0 | 0 | 1 | 1 |
| Disable 6to4 interfaces | 0 | 0 | 0 | 0 |
| Disable Isatap interfaces | 0 | 0 | 0 | 0 |
| Disable Teredo interfaces | 0 | 0 | 0 | 0 |
| Disable native interfaces (also PPP) | 0 | 1 | 0 | 1 |
| Prefer IPv4 in default prefix policy. | 1 | 0 | 0 | 0 |
| Disable CP interfaces | 0 | 0 | 0 | 0 |
| Disable IP-TLS interfaces | 0 | 0 | 0 | 0 |
| Binary | 0010 0000 | 0001 0000 | 0000 0001 | 0001 0001 |
| Hexadecimal | 0x20 | 0x10 | 0x01 | 0x11 |
Using the network properties GUI to disable IPv6 is not supported
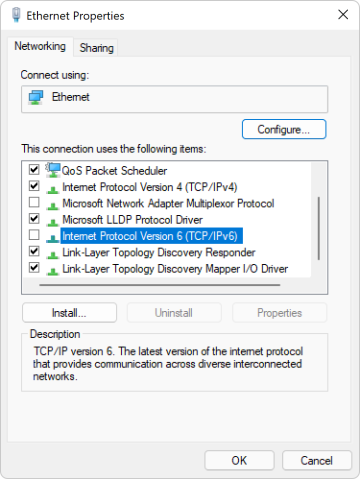
This registry value doesn't affect the state of the following check box. Even if the registry key is set to disable IPv6, the check box in the Networking tab for each interface can be selected. This is an expected behavior.
留言
張貼留言